Motor & Propeller Orientation & Position (Drone won't take off, Flips out or throttles up on arming)
Introduction
Motor and propeller issues are some of the most common problems we see with drones, and are the most common "brick wall" new drone operators run into.
Luckily, there's a multitude of simple issues which can cause this - which also means there's a multitude of simple fixes. Let's run through the checks, and hopefully you'll be in the air in no time!
Configurators
These are used to configure your drone - download the one appropriate for your flight controller. Most use Betaflight by default, but you should check your board or drone specifically to be sure.
How to download from GitHub; The latest release is at the top, avoid "Beta" or "Release Candidate" unless you know what you're doing. Look for the "Assets" button, click it and click the link appropriate for your operating system, and your download will start.

Please note; This guide uses Betaflight configurator as of 19/05/2022 for illustration - your configurator may differ. If you do not use betaflight firmware the steps to check or fix the issue may not match or work the same way in your configurator, but the idea behind them is the same for all firmware.
Common Potential Issues and Fixes


Remember to Save any changes you make! If you don't save your changes and you try to re-test, you may think that the fix didn't work, but in reality, it just hasn't applied!
The Save button in betaflight is at the bottom right - it may say "save" or "Save and Reboot" - either way, click it if you make any change in the configurator.

Propeller Orientation (Are the propellers facing the right way?)
The image below shows two typical propellers - three and two blade. The direction they spin is toward the leading ("highest") edge of the propeller. You can use the profile (shape) of the propeller to determine which edge is "on top" and which is the "lower" or trailing edge. The illustration shows the leading edge and direction of spin for these propellers as a reference.
Now you know which way the propeller should spin, you can compare to your configurator. In betaflight, navigate to the "Motors" tab (sometimes the diagram is under the "Configuration" tab instead), and you will see the orientation your propellers should be installed in, it'll either be normal or reversed. For the purposes of this guide, it doesn't matter which your drone is set to, as long as you make sure your propellers are spinning in the direction indicated buy the yellow arrows / circles. See the images below for reference. The (imaginary) arrows in the image above should match the direction of the arrows in these images. The red arrow on the configurator images below indicates the "Front" of the drone for reference.
If for any reason your propellers do not match this orientation, then swap them around so that they do! This is the simplest fix, if your propellers were wrong, your drone can do all sorts of weird things. You don't need to make any changes in the configurator, just move your propellers to the right places, cross your fingers, and test in a safe environment!
Gyro Orientation (Does the drone know which way it's moving?)
There's a very easy way to check that your gyro is oriented correctly - in your configurator, look for the 3D model of a drone. In betaflight, it's found under the "Setup" tab and looks like the image below. This model should move as you move your real drone around. If it doesn't move at all - lay your drone on a flat surface and click "Calibrate Accelerometer" - wait for it to complete and then the model should move.
Try tilting it left and right, forwards and backwards - the model on the screen should respond and move in the same direction (it might be a little slow - don't worry if it is! Just make sure it make sure the movement matches). If it does match, then your gyro is fine and you can move on from this step. If it doesn't, see below for how to fix it!
Try tilting it left and right, forwards and backwards - the model on the screen should respond and move in the same direction (it might be a little slow - don't worry if it is! Just make sure it make sure the movement matches). If it does match, then your gyro is fine and you can move on from this step. If it doesn't, see below for how to fix it!
So, your gyro appears to be all over the place - your model isn't moving in the direction that the real drone is - left is right, right is left, or maybe forwards is left and left is forwards! Whatever the case, look for these settings under the "Configuration" tab in betaflight;
From here, you can change your gyro orientation to many different alternatives. Assuming your board is installed either in line with or 90 degrees offset to your drone, you can use the circled drop down to check other orientations until you find the one which works for you. If you have a more custom installation, you may need to use the Roll, Pitch and Yaw degrees above to change the orientation. Remember to save before re-testing!
Motor Position (Does the drone know which motor is where?)
If you've been following step by step, you'll have seen the image below before - if not, don't worry!
This diagram (or similar) can be found in your configurator- in betaflight, it's under either the "Motors" or "Configuration" tab. For the purposes of this guide, it doesn't matter if your motors are reversed or not, we only care about the numbers - these indicate the position of the motor.
Under the "Motors" tab (you are likely already in this tab if you can see the above diagram), you will see a settings / control panel which looks like the image below. Make sure to read the warning we've highlighted in this image, and REMOVE YOUR PROPELLERS! We'll be spinning the motors up in a moment, and we don't want any damage or injury, or unexpected flight.
Once you've made sure no propellers are attached and they're well away from you so the urge to reattach them has entirely dissipated, enable "Motor Test Mode" by clicking the switch next to "I Understand the risks" (you did remove your propellers, right?). You have now armed your drone, and the vertical sliders can be used to spin up the motors. Move on to the next steps below the screenshot.
Now, lift the number 1 slider a little, slowly, until a motor starts spinning on the drone. Make a note of where it is on the drone - see the diagram below for an example.
Drop the slider back to 0 and repeat for sliders 2, 3 and 4, until you have a completed diagram like below;
If your diagram matches the configurator diagram, then there's nothing to worry about! Your motors are in the right position and you can move on. If they don't match, then here's how to sort it;
Go to the CLI tab, and wait for it to load completely. When it does, type "resource" and press enter. You will be given an list of all the inputs/outputs on the drone, it may look confusing. Don't worry! Look for the "motor" resources shown in the diagram below. For a quadcopter, we're only interested in motors 1 through 4;
Now, write these resources next to the corresponding motors on your diagram - see below for an example with our diagram;
Finally, on the diagram, write the "Correct" motor positions from the configurator - this may look a bit busy on the diagram, but it will help in just a moment;
Now we can easily see which resource should be assigned to which motor. For example, Motor 1 should use resource C07 in our diagram above, but C07 is currently assigned to motor 2. So, here's how we fix that;
Open a text file and copy and paste the following;

resource motor 1
resource motor 2
resource motor 3
resource motor 4
save
Next to each line, write the resource from your diagram which is in the position that the motor *should* be in. That is to say, use the numbers we added last to the diagram, not the ones from the start! To help explain, here's what our example fix would look like;
---EXAMPLE DO NOT USE----
resource motor 1 C07
resource motor 2 C08
resource motor 3 C09
resource motor 4 C06
save
---EXAMPLE DO NOT USE----
Now you have your completed fix, copy all the text from your file, and paste it into the CLI in Betaflight. Press enter. Your drone should apply the new map and reboot. Once it's rebooted, test the motor positions again using the steps from the start, and you should find they're in the right places! If they aren't, you may need to repeat all steps above.
Motor Spin Direction (Are the propellers spinning the way the drone is expecting?)
You might have the propellers installed correctly and all the motors in the right positions - your gyro may even be working a treat - but if your motors aren't spinning the right way, your drone is spinning all over the place. Let's check, and if needed, fix that.
Firstly, locate the diagram below in your configurator - it's under the "Motors" or "Configuration" tab in betaflight, depending on your version. You will notice the motors can be reversed, we've included both diagrams below. Note that the direction of the arrows in the diagrams changes depending on whether or not your motors are reversed - it doesn't matter which one yours is, but the direction of the arrows in this case does matter.
Remove your propellers and attach a small piece of tape or a similar indicator to your motors, like a flag. See below for an example;
Under the "Motors" tab in betaflight (you are likely already in this tab if you can see the above diagram), you will see a settings / control panel which looks like the image below. Make sure to read the warning we've highlighted in this image, and really this time make sure that you REMOVE YOUR PROPELLERS! We'll be spinning the motors up in a moment, and we don't want any damage or injury, or unexpected flight.
Next, enable "Motor Test Mode" by clicking the switch next to "I Understand the risks" (you did remove your propellers, right?). You have now armed your drone, and the vertical sliders can be used to spin up the motors. Move on to the next steps below the screenshot.
Now, lift the number 1 slider a little, slowly, until a motor starts spinning on the drone. You should have the motor spinning as slow as possible, as this helps to assess the direction it's spinning in.
Make a note of the direction it's spinning in, and compare to the configurator diagram - does the arrow match the rotation of your motor? If yes, brilliant! Stop the motor and repeat with motor 2, 3 and 4.
If not, or if you find any of the motors spinning the wrong way - there's two ways to sort this;
Method A - Reverse in ESC Configurator
There are loads of configurators on the market - the two we'll focus on are Bl_Heli_S and Bl_Heli_32 as these are the most common. You can check online for your configurator or use method B if this guide doesn't cover your configurator - though the steps will likely be very similar;
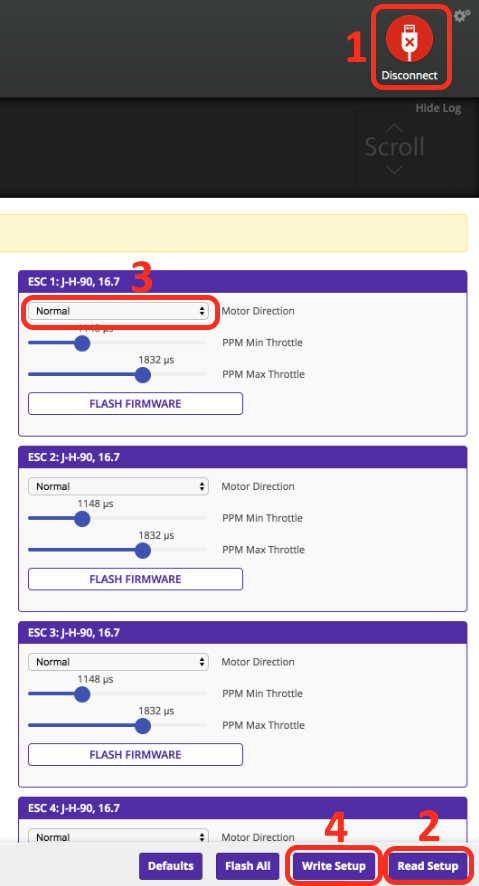
1 - Disconnect your drone from betaflight, and power it with a LiPo battery. The USB alone does not power the ESC for most drones, so we have to connect the battery to be able to "talk" to the ESC.
2 - Download your ESC configurator - For Bl_Heli_S; https://github.com/blheli-configurator/blheli-configurator/releases
For Bl_Heli_32: https://github.com/bitdump/BLHeli/releases
3 - Install and open your configurator, make sure your drone is connected to the PC and no other apps are open!
4 - In your configurator, click "Connect" (Labelled 1 in the images below). Then, click "Read Setup" (Labelled 2 in the images below).
Bl_Heli_32 ->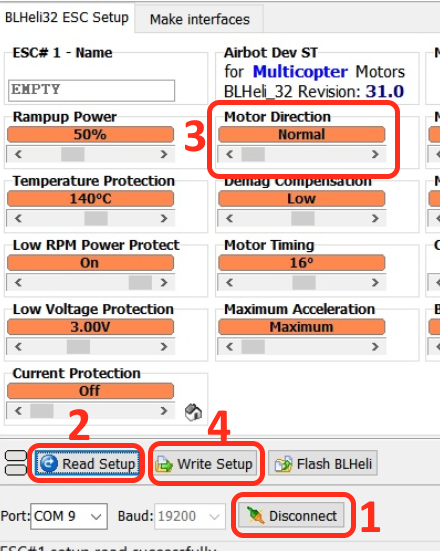
 <-Bl_Heli_S
5 - Locate or select the ESC number which corresponds to the motor number you need to change the direction for. In Blheli32, you can right click the numbered box on the bottom of the configurator to select that one ESC. If you have multiple selected, it will change the direction for all of them!
6 - Swap the motor direction from "Normal" to "Reversed" using the slider (Labelled "3" in the images above).
7 - Click "Write Setup" (Labelled 4 in the images above). Then, when successful, disconnect from the configurator (Labelled 1 in the images above), reconnect to betaflight and re-test.
8 - You're done! The motor should be reversed. Repeat for other motors if needed - don't forget to check them!
Method B - Reverse by swapping wires (Not recommended for pre-built drones as this may void warranty!)
If you can solder, this one is simple. Swap any two motor wires, and the motor will spin the other way. Make sure you disconnect your drone from the computer and any power source, and simply swap any two motor wires around - shown in the diagram below (we've swapped the red and green wires in this diagram but you can swap any pair - your wires likely aren't coloured, the diagram is coloured for illustration only);
Voila! Your motor now spins the other way. If you're wondering how this works, it's a quirk of a three-phase motor design. The motor spins because there's essentially 3 electromagnets in the motor which are powered one after the other in a cycle. If you take a cycle of 3 and swap any two positions around, the direction of the cycle reverses. You can try it yourself, read the numbers on the left below over and over, "1, 2, 3, 1, 2, 3..." and then pick any two and swap them. Do the same again - you'll find you're now saying/reading "3, 2, 1, 3, 2, 1". It's reversed!
That's it for this method. Just make sure you check your other 3 motors, too!
Receiver / Radio Channel Mapping (Does the drone know which stick movement does what?)
This one isn't quite a motor issue, but it can certainly cause confusion which can lead to the motors being incorrectly blamed.
Connect your drone to betaflight, and connect a LiPo to your drone to be sure that the receiver is powered.
Then, go to the "Receiver" tab in betaflight. Here you'll see a chart like the one shown below - and as you move the sticks, you'll see the bars move up and down. These are your channels. Roll (Ailerons, A), Pitch (Elevators, E), Yaw (Rudder, R) and Throttle (...Throttle, T).
On the right, you can see your channel map - these are the positions the channels are currently in. For example, as the text is "AETR", Channel 1 from your radio is being interpreted as A (Roll), 2 is being interpreted as E (Pitch), and so on.
Move the sticks on your radio up and down, left and right, and watch the channel that moves - if it's the channel you're expecting, awesome! You don't need to move it. If it doesn't, then you need to re-order the channels.
To swap these around, simply re-type the text in the circled box, then click save. For example, you can type EATR1234 to swap the A and E channels. Repeat until the stick movement matches the channel movement you're expecting, save again for good luck, and you're done!
Related Articles
FPV Drone Component Buying Guide - Parts Compatibility
I. Introduction: Mastering FPV Drone Part Compatibility A. The Enduring Principles of a Harmonious FPV System The world of First Person View (FPV) drones is one of rapid innovation, with new components and technologies emerging at a breakneck pace. ...Mounting the nanoHD F2 Optic Fibre Air Unit & Camera on a UMT FPV Drone
This guide explains how to correctly wire and mount the nanoHD F2 optic fibre air unit, camera, and fibre reel on a UMT FPV drone, including correct use of the UMT 3D-printed mounting kit. It is written specifically for UMT FPV frames (PD10 shown) ...Why Is One Motor Spinning Differently After Arming in Betaflight?
Quick Answer It is completely normal for motors on a Betaflight drone to spin at slightly different speeds when armed and on the ground. This is a sign that the flight controller's stability system (the PID controller) is working correctly. It is ...BetaFPV Cetus Drone Troubleshooting Guide
Here are some of the most common issues we find occurring with the BetaFPV Cetus Drone along with steps you can take to resolve them. Read the Manual First As obvious as it sounds, the manual covers a bunch of helpful information so please download ...What components are typically included in FPV drone build kits, and what additional items might I need to purchase separately?
Understanding FPV Drone Build Kits: Included Components and Additional Requirements FPV (First-Person View) drone build kits are popular among enthusiasts who prefer a hands-on approach to assembling their drones. These kits typically include ...